If you have any questions—or discover cool UNIX tricks—please get in touch! You can email Jeff Rich (jrich@carnegiescience.edu) or me (amatthews@carnegiescience.edu) or find us in our offices (#130 and #132).
UNIX Introduction
UNIX is an operating system first developed in the 1960s, but remains under constant development to this day. It is made up of three parts: 1. the kernel, 2. the shell, and 3. the programs. This is all about the shell—which interfaces between the kernel (the hub of the operating system) and the user (you!).

Why learn UNIX?
It’s powerful, but don’t take my word for it. The research publication Nature listed “Five reasons why researchers should learn to love the command line,” summarized here:
- Wrangle files. You can repeat simple tasks (like renaming, adding a date stamps, converting to a different format) across multiple files.
- Handle big data. At a certain point, data sets become too big for GUI programs to handle. Using the command-line you can quickly sort through large numbers of files (>millions) and/or extract information from large files.
- Manipulate spreadsheets. From the command line you can cut and extract columns, count words/lines/characters, filter files for a certain condition. Using the ‘pipe’ function you can combine these functions.
- Parallelize your work. You almost always (maybe actually always?) interact with high performance computing systems (HPCs) through the command-line and bash scripts.
- Automate. Anything you can type on the command line can be included in a bash/shell script. This means you can line up various commands to run after one-another, and you can even schedule them to run at a particular time!
Opening a terminal:
There are many ways to open a terminal (also called the “command line”) on either Mac or Linux machines, but here are some quick options: On a Mac: ⌘ Cmd + Space and type terminal, hit enter. On a Linux: Click Applications → System Tools → Terminal. On a Windows: (Your machine should have
bashaccesible from the Windows Terminal, or if you have Visual Studio you can use that! We will help you figure it out.)
There are different types of shells (e.g. bash, csh, zsh, etc.), but we will be using the bash shell. To check what shell you’re using, type: echo $SHELL in the terminal:
$ echo $SHELL
/bin/bash
echo tells the terminal to write the given text to screen. For example:
$ echo 'Am I a cat?'
Am I a cat?
The $ before echo just indicates the beginning of the line on a Linux-based machine. It may differ depending on whether you are using a Linux or a Mac machine. The $ before “SHELL” in echo $SHELL indicates a shell variable. Shell variables can be useful for scripting and customizing your workspace.
Directories and Navigation
Let’s get familiar with navigating the filesystem on our computer. The home directory is indicated by the special character ~. On a Mac, this is equivalent to /Users/[your computer name].
We’re going to be downloading a sample directory to play around with, but before we do, let’s create a suitable place for it to live. To make sure we are in our home directory, type cd in the command line, this changes to the home directory regardless of where you are in your filesystem. To create a new directory, we will use the command mkdir:
$ mkdir cassi
This will create a new directory named cassi (you can name it whatever you want!) in the home directory. To enter the directory, type cd cassi. If you want to list all files and subdirectories within a directory, type ls. Since we just created this directory, there are no files and nothing should appear.
There are two command line tools commonly used to download files from a server: wget and curl. wget is a simpler transfer utility that can be used with urls beginning with http,https, ftp, and ftps. curl has expanded capabilities, such as supporting more protocols (sets of rules governing the communication and exchange of data over the internet) and more options for uploading files. If it’s a simple task, wget is most likely sufficient.
In the cassi directory, we are going to download a sample directory set to play around with. To download with wget:
$ wget https://github.com/allison-matthews/unixtutorial/archive/main.zip
and to download with curl:
$ curl -L -O https://github.com/allison-matthews/unixtutorial/archive/main.zip
Notice the -O in the curl command, this is necessary to save the contents to a file/directory, otherwise everything would be printed on the command line. wget will automatically saves the contents to a file/directory.
tar and zip
Compressed and/or archived files and directories can have different file endings corresponding to the algorithm used for the compression: .zip, .gz, .tar , .tgz, .tar.gz, etc. tar was originally designed for creating archives to store files on magnetic tape which is why it has its name “tape archive”. If there is a z in the file extension, it means the file/directory was compressed - files ending simply in .tar are uncompressed. There are many options you can use with tar when uncompressing a file/directory. A common usage is: tar -xzvf filename.tar.gz.
To create an archive with tar, you might use something like: tar -czvf tarfile.tar *. This creates a tar file named “tarfile.tar” with all the files in the current directory. To list the contents of an archive: tar -tzvf filename.
The ZIP format supports lossless file compression, and files with the extension .zip may contain one or more directories. To extract the contents of a .zip archive, use the unzip command: unzip filename.zip. If you don’t want to see the printed messages: unzip -q filename.zip (-q means quiet). Likewise, you can use zip in the same way to compress a file: zip filename.zip file or a directory: zip -r directoryname.zip directory/.
Practice:
Extract the contents of unixtutorial-main.zip

Exploring detailed information of files/directories
If you type ls into the command line now, you should see a list of files and subdirectories. In order to list more information on the contents, enter ls -l. You should see something similar to the image below.
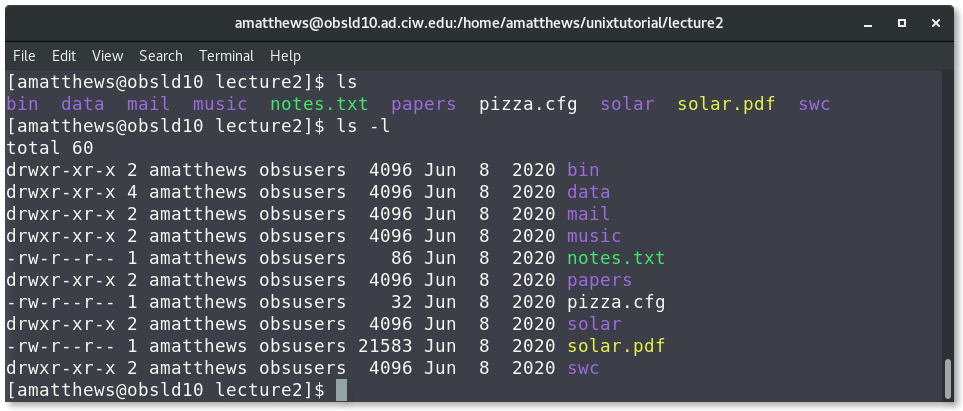 Lines that begin with d indicate directories. The first column lists the file/directory permissions: r: read permission, w: write permission, x: execute permission.
Let’s explore the Permissions a little more:
write, and execute]); A --> D([r-x: GROUP can read,
execute, but not write]); A --> E([r-x: OTHERS can read,
execute, but not write])
Sometimes you may want to change the permission of a file or directory. In order to do so, you use the chmod command. For example, to give write permissions for the file README.md to group members and all others on the computer:
$ chmod go+w README.md
 Now the user, the group, and all others can write to the file
 README.md. To remove permissions, use - in the place of +. As shown above, g and o correspond to group and others permissions, and it follows that u is used when changing user permissions. Without specifying u, g, or o, the default is to change only the user (u) permissions.
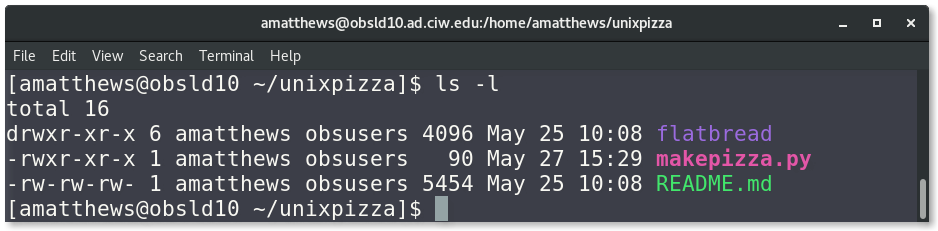
You may have noticed that my sample directory is named unixpizza instead of unixtutorial-main. The mv (move) command changes a file’s complete path, so we can use the command to simply change a file or directory name. For example, while in the cassi directory, you can input the following the change the directory name of unixtutorial-main to something easier to type.
$ mv unixtutorial-main unixpizza
Suppose we want to move the makepizza.py file into the sub-directory: flatbread/. While in the unixpizza/ directory:
$ mv makepizza.py flatbread/makepizza.py
While in the unixpizza/ directory, if you wanted to move something (the makepizza.py file, for example) in the flatbread directory back into the unixpizza/ directory:
$ mv flatbread/makepizza.py makepizza.py
OR
$ mv flatbread/makepizza.py .
The period . indicates the current directory, so that command is telling the computer to move the file makepizza.py from the flatbread/ directory into the current directory, keeping its name makepizza.py. There are times when you may want to move a file to a different directory and change its name in the new directory. This can be done with one command in the terminal. For example, to move the python program makepizza.py into the flatbread/ sub-directory and change its name to make_me_a_pizza.py:
$ mv makepizza.py flatbread/make_me_a_pizza.py
WARNING: If you use mv to change a filename to something that already exists in that directory, it will overwrite the existing file. There is no way to recover it.
| COMMAND | ACTION |
|---|---|
pwd |
(present working directory) show the full path of your current directory |
cd |
(change directory), alone this will go to your home directory |
cd - |
go to the last directory you were in |
cd .. |
go up one directory |
ls |
list items in directory |
ls -l |
a “long listing” of items in the current directory with time of creation and file permissions |
ls -lt |
a “long listing” of items in the current directory with time of creation and file permissions, sorted by most recently modified |
mkdir |
make new directory within current directory |
chmod |
change mode: change the permissions of a file or directory. |
mv |
move a file to a different directory or change its name |
cp |
copy a file to a new filename or into a different directory |
cp -r |
-r tells the computer to copy directories recursively, saving you from having to copy files individually. |
Control Characters
Your mouse won’t be able to move your cursor on the command line, but control characters allow you to move around with ease. You might even find it faster. Here are some scenarios where control characters come in handy:
- Suppose you’re trying to run a python script and notice you made a typo at the very beginning of the line. Instead of hitting the left arrow repeatedly in frustration, you can type
cntrl-aand your cursor will move to the start of the line. - Sometimes you haven’t had your tea or coffee yet and you start running a program before realizing you forgot to change a parameter or filename within the code. The good news is you don’t have to wait until the program finishes to go back and make your changes. Instead, typing
cntrl-cinto the terminal will cancel whatever command is running.
Below is an incomplete list of some control characters that make life just a little more efficient:
| CONTROL CHAR | ACTION |
|---|---|
cntrl-a |
move cursor to start of line |
cntrl-e |
move cursor to end of line |
cntrl-c |
cancel command |
cntrl-l |
clear terminal screen (same as clear) |
cntrl-k |
delete from cursor to end of line |
cntrl-a cntrl-k |
go to beginning of line and delete whole line |
Tab Completion
If you start typing a few characters of a file or directory, e.g.
$ cd Downl
and then hit the tab key. The shell will automatically complete the directory (or file) name that matches the start of what you typed. This can be very helpful with long filenames. The shell will complete the name until there is no longer a unique match. Example: suppose you had a directory with the following files:
Tile_8615432346_15.pkl
Tile_8615432350_15.pkl
Tile_8615432357_15.pkl
Typing ls -l Ti and then tab will result in this on the command line:
$ ls -l Tile_86154323
Entering another character (say 4) will result in only one unique match, and then tab will complete the enter filename
$ ls -l Tile_8615432346_15.pkl
Aliases
If typing ls -l is more trouble than it’s worth, we can make an alias for it! In the terminal, type alias. This will list the current aliases you have set up thus far, which may be none - but that will change. To establish an alias for ls -l:
$ alias ll='ls -l'
This can also be useful if you frequently make the same typos. For example:
$ alias emasc='emacs'
Now, if you enter alias into the terminal, it should read
alias ll='ls -l'
alias emasc='emacs'
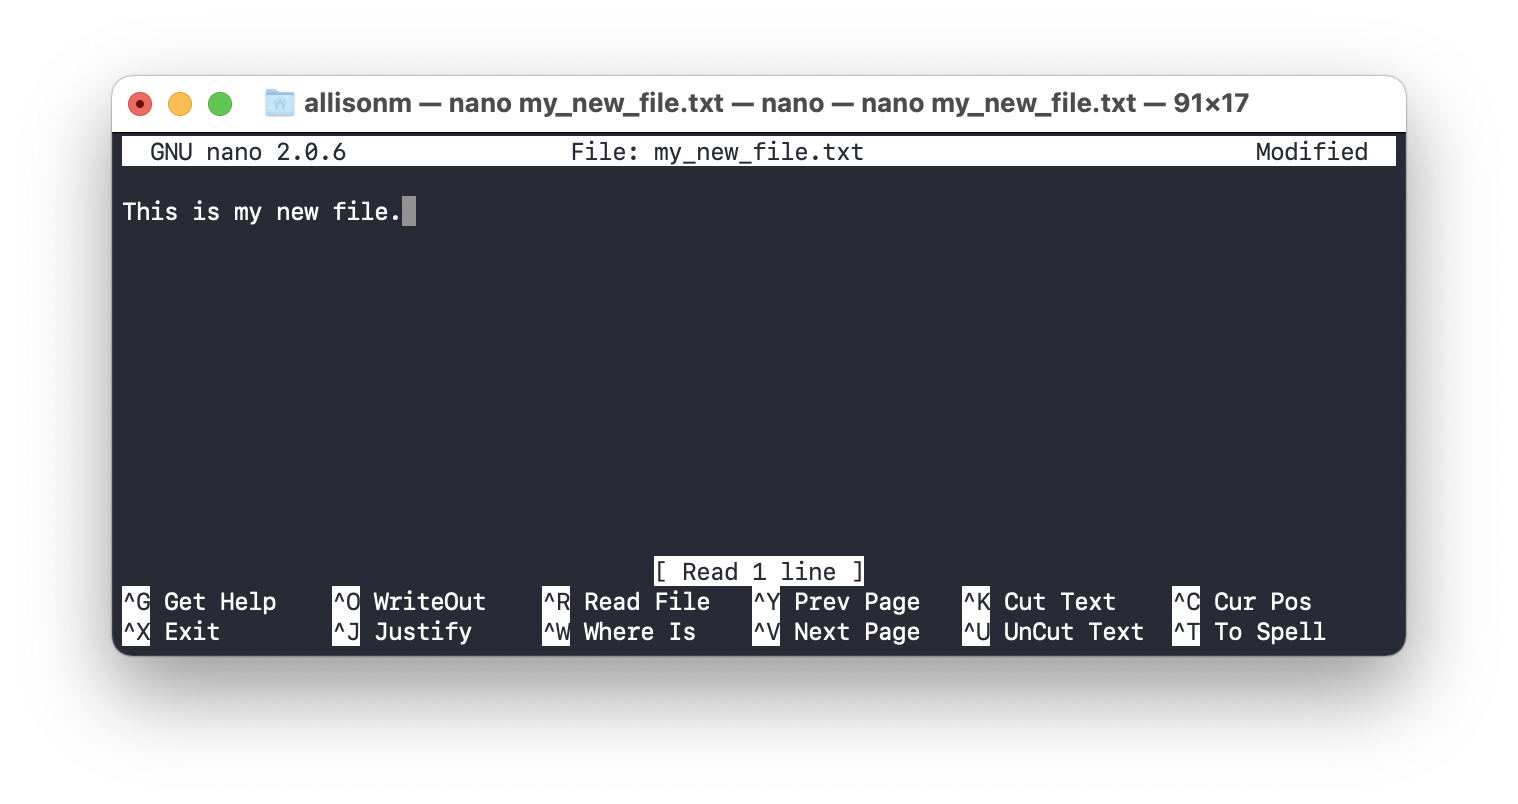
Text editors via the terminal
 Jupyter notebooks are useful for some things, but you often want to create and run python programs directly from the command line. There are many text editors, but two extremely popular (and therefore likely to be available on most computers) are emacs and vim. Scientists and programmers have been arguing about which is better for decades (see above comic), but in reality they both get the job done. A good text editor to start with is nano. To create a file with nano:
nano my_new_file.txt
Practice:
Work with your neighbor to create a python program that prints “Hello Carnegie!” using nano. To run your python program, type:
python program.pyon the command line.
Miscellaneous, but very useful, commands
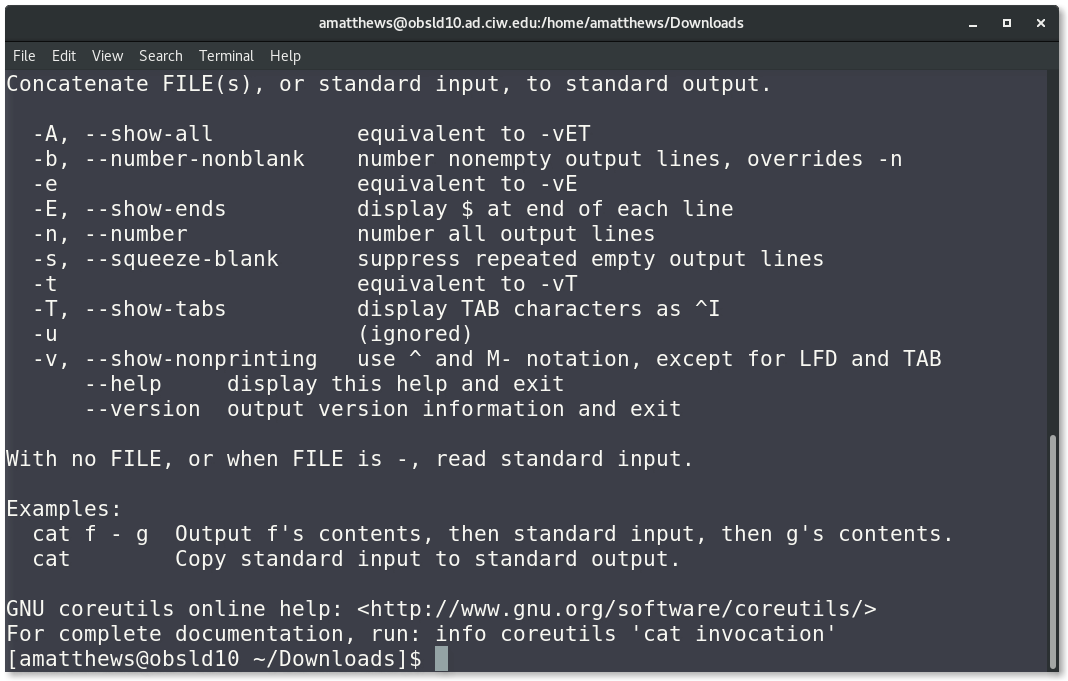
A note before going through individual commands: if you ever need more information on what a command does or what additional options you can feed it to get a certain output, use man (manual) or --help.
$ man cat
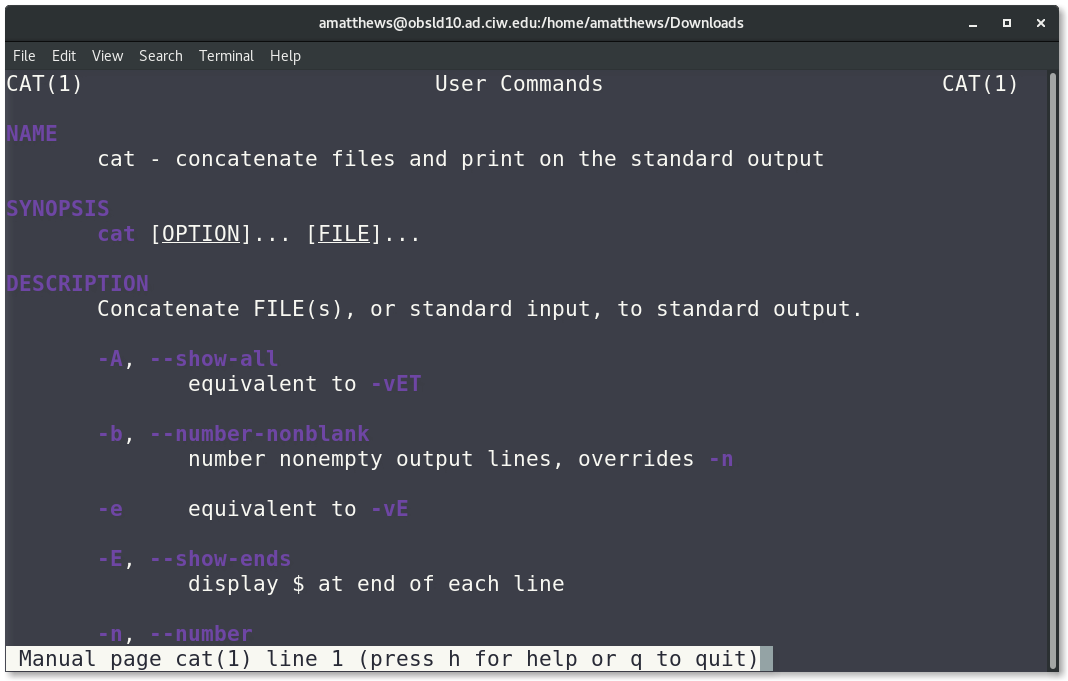
$ cat --help
 NB: There is a package called
 cheat which you can download that gives much more readable information and examples. See the “Resources” section for details on installing and using it.
top and ps
There may come a time when you need to kill a program and cntrl-c is not doing the trick. Entering the top command in your terminal will list all processes on your computer with their Program ID’s (PIDs).
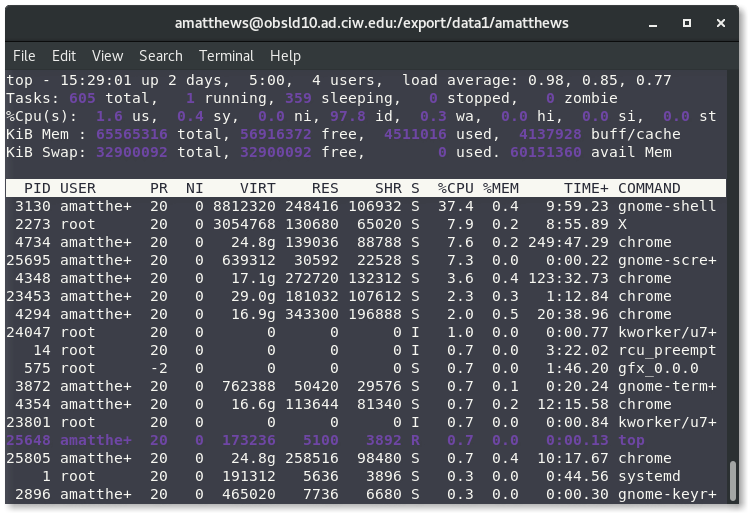
If you need to force kill a program, find the associated PID (3130 for example) and type
kill 3130
top is also useful for determining how much memory and CPU a program is using. If a program seems to be running much more slowly than you anticipated, it could be because there is no more available RAM (random access memory).
ps is another useful command for finding a PID, especially if you are looking for processes with a name or string that you already know. When run on a personal computer ps -A returns a list of all processes run by every user, including root.
This is likely many hundreds of processes, so you can either use this command in combination with ‘grep’ (see below) or you can direct the output to a text file using ps -A > proc.txt. You can then view proc.txt with a text editor and search for the PID. In general > can be used to direct text output to a file and may be handy in other situations.
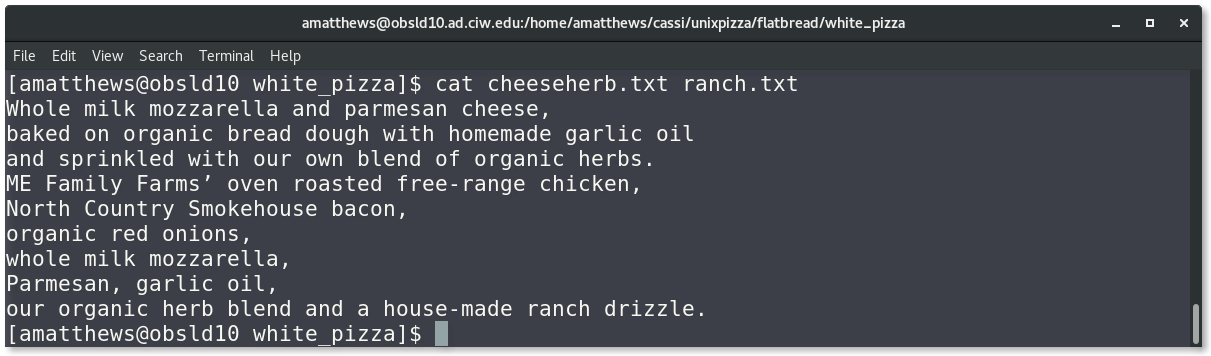
cat
The cat command (short for concatenate) outputs the contents of a file to the command line.
 It works on multiple files.
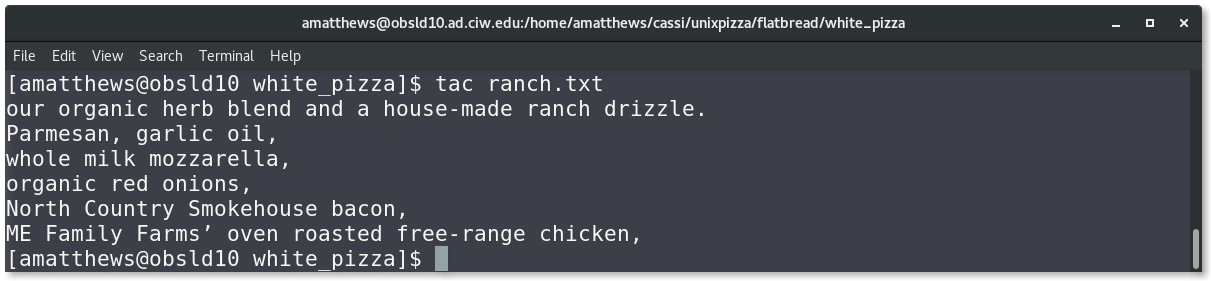
 Here is a good resource for more information and examples on how you can use
 cat, including printing the output of file with line numbers, creating files, copying the contents of a file to another. My favorite: to display the lines of a file in reverse order use tac instead of cat (clever).
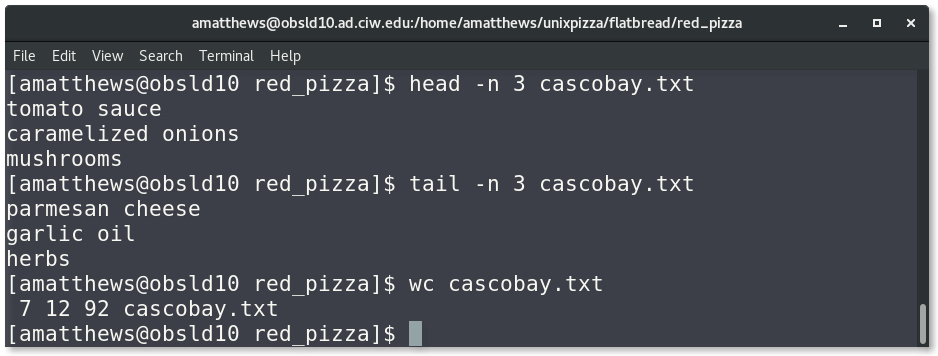
head, tail, wc
The commands head and tail enable you to view the first (head) or last (tail) lines of a file without having to open it. By default, these commands will show the first/last 10 lines. If you want to only see the first/last 3 lines, you can use the -n option followed by the number of lines you wish to see. There is also a command called wc (word count) which tells you three statistics about a file: 1) the number of lines, 2) the number of words, and 3) the number of characters. See the example below.
grep, sed
Regular Expressions are used for textual pattern matching and is almost a computer language onto itself. It is built into most modern programming languages (the python package is called re) and text editors. On the command line, you can use regular expressions through the grep command (get regular expression). To use grep:
$ grep <pattern> <files to search>
Here are some simple search examples:
| grep input | translation |
|---|---|
$ grep cheese carne.txt |
select all lines in carne.txt containing ‘cheese’ |
$ grep '^p' carne.txt |
^ = start of line, select all lines starting with ‘p’ |
$ grep 's$' carne.txt |
$ = end of line, select all times ending with ‘s’ |
Square brackets match a single character. For example, [bc]at will match ‘bat’ and ‘cat, but not ‘hat’. You can place a range of letters or numbers inside the brackets:
| input | translation |
|---|---|
[b-k]at |
matches ‘bat’, ‘cat’, ‘gat’, but not ‘mat’ or ‘pat’ |
[3-6]5 |
matches 35, 45, 55, 65, but not 75, 85, etc. |
[a-z] |
matches any single lowercase letter |
[a-zA-Z] |
matches any single upper or lowercase letter |
[a-zA-Z]& |
matches any character that appears at the end of a line |
[^abc] |
matches any character except ‘a’, ‘b’, or ‘c’ |
The website https://regex101.com/ allows you to test regular expressions to ensure they match the pattern you want. They also have a fun quiz to practice your regex skills!
Practice:
Without opening any files:
- Use
grepto find the pizzas that contain onions.- Combine
grepandsortto find the pizzas that use the word “organic” the most times. (Hint: remember you can type –help after a command to see additional options!)- Head to https://regex101.com/quiz and try out their practice problems!
sed stands for stream editor, and while it has a ton of capabilities (e.g. searching through a file, find and replace, insertion and deletion) the most common thing it is used for is find and replace. For example, in the past I’ve run programs that needed a separate file that listed the values of parameters being used. I wanted to run the program many times for a range of parameters, so instead of manually opening the file, finding the right line, and making the change, I used sed! If you want more examples of how to use it, go here.
pipe, sort
pipe allows you to input the output of one command directly into another. Suppose you want to output the sorted contents of a file to the terminal. You can do this by ‘piping’ the output of cat to the command sort:
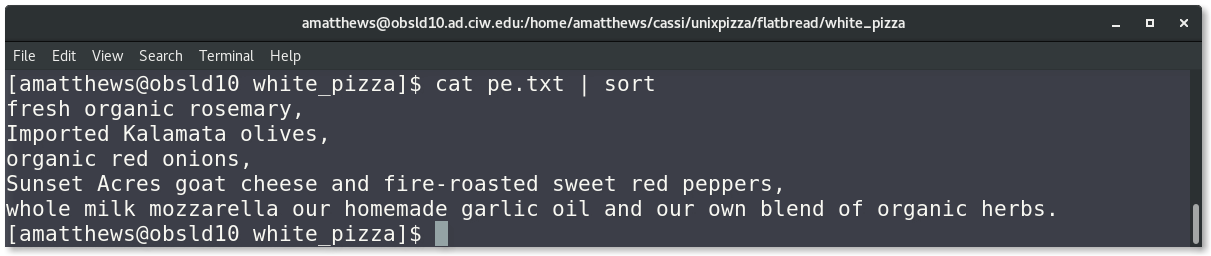 Truthfully, you would have gotten the same output by entering
 sort pe.txt, without the pipe.
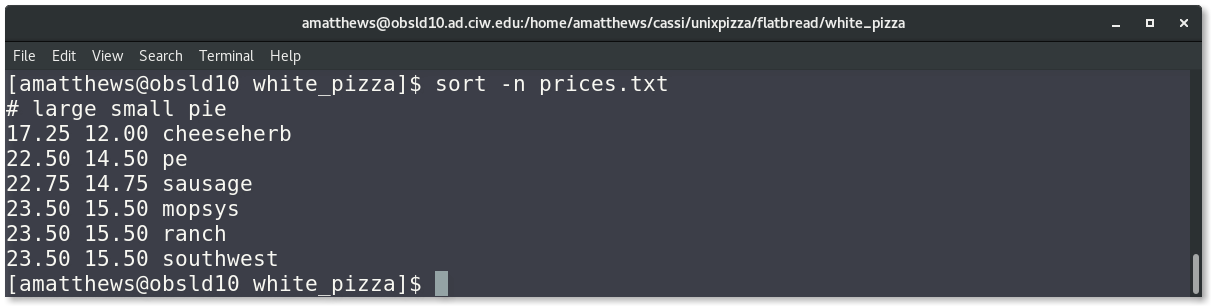
If you want to sort a file numerically, use the -n option:
Practice:
Without opening any files:
- Combine
wcwithsortto list the files from those with the fewest lines to the most lines.- Same as above, but list the files from those with the fewest characters to the most characters. (Hint: remember you can use –help after a command to see additional options!)
history and !
As you are working you may find that you’ve forgotten a command or sequence and want to double check that you didn’t accidentally delete the wrong file, or you may want to run a command again. Typing history will return a list of all the commands run in that terminal window or shell. If this list is long, you can pipe the list to more:
$ history | more
If you would like to re-run a command in your history, you can use ! followed by the command number in the history. For instance, if you want to rerun command 37 in the list generated by history:
$ !37
will issue that same command. The ! command has a lot of functionality and my be handy in certain situations, see more at https://www.redhat.com/sysadmin/bash-bang-commands
Wildcards * , ? and []
When dealing with files, using wildcards can be a useful way to handle several files at once. If you would like to list all files ending in “.tar” in your current directory for instance, you can use
$ ls *.tar
the string *.tar will allow the command to act on any file that ends in ‘.tar.’ The * may be placed in one or more places in a string:
$ ls *a*
$ ls flatbread/*/*txt
The first command lists all files with an “a” somewhere in the filename, the second command will list all files in all of the subdirectories of “flatbread” that end in “.txt”
You can use ? as a wildcard for single characters:
$ ls flatbread/???_pizza/
$ ls flatbread/???_pizza/*txt
These commands will list any files or the files ending in “txt” in subdirectories of “flatbread” that begin with three of any character and end in “_pizza”
Finally, [] can be used to list files with a range of letters or numbers. This command can be useful when managing lists of files:
$ ls flatbread/white_pizza/[p-s]*txt
WARNING: Be extremely careful when using wildcards when deleting files!
To learn more about wildcards, visit https://www.warp.dev/terminus/linux-wildcards
Replacing Characters with ^
If you are issuing a series of commands and you make a typo, you can replace a string in the command you just issued using ^. This can be especially handy if you’re dealing with file or directory names:
$ cat flatbread/white_pizza/ransh.txt
cat: flatbread/white_pizza/ransh.txt: No such file or directory
$ ^ransh^ranch
This will replace the first instance of “ransh” in the previous command with “ranch”
Connecting to a remote machine
(this section came from a previous tutorial put together by Drew Newman and Mahdi Qezlou - thank you!)
This summer, some of you may be asked to connect to a remote machine or download/upload files to/from it. You can do it all from your terminal via ssh command (secured shell).
NOTE: To connect to computers on the Carnegie network from off campus, you need to be connected via the VPN. If you need this access, please ask one of us or Chris Burns and we will get it set up. First, you need to know the domain, username, and password of the remote machine. If the remote machine is a high-performance computing center like Mies in Carnegie, ask the support group to share this info with you. You can also set up ssh access to a desktop located somewhere else. The simplest working example on how to use ssh is:
$ ssh username@domain
For example:
$ ssh amatthews@ssh.obs.carnegiescience.edu
It will ask about your password and then connect you to the shell on the remote machine. From then on, you are using the terminal on that machine.
Transferring files to/from the remote machine:
If you need to transfer files between your local computer and the remote machine, you should use commands like rsync. This command is based on ssh; therefore, the username and passwords are the same. rsync recursively updates the desired files on your local or remote machines, and if any of the files already exists on the destination directory and are the same as the new one, they will not be transferred.
Example transferring from your local machine to a remote machine:
$ rsync -a -P path/to/local/files amatthews@ssh.obs.carnegiescience.edu:/path/to/remote/files
Example transferring from a remote machine to your local one:
$ rsync -a -P amatthews@ssh.obs.carnegiescience.edu:/path/to/remote/files /path/to/local/destination
The -a option preserves some info on the files like ownership, groups, permission, and modification time. The -P option loads a progress bar and permits partial transfer in case your network cuts off. Once reconnected, using rsync again downloads the remaining portion of the files.
Additional Resources
- A long list of UNIX commands.
cheatis a package you can download that enables you to type a UNIX command tight in the terminal and see the definition, how it is used, and various examples (it’s really useful).- You can download
cheatusing the package manager Homebrew. - If you don’t have Homebrew installed, follow the instructions on the homepage to do so.
- To install
cheat:brew install cheat - Or you can look at additional ways to install it here.
- Here is an example of what the
cheatcommand outputs when you use it. It gives you not only directions for use, but real examples with explanations. NB:tail -fcan be very useful if you’re having a program update a file and you want to check on its progress!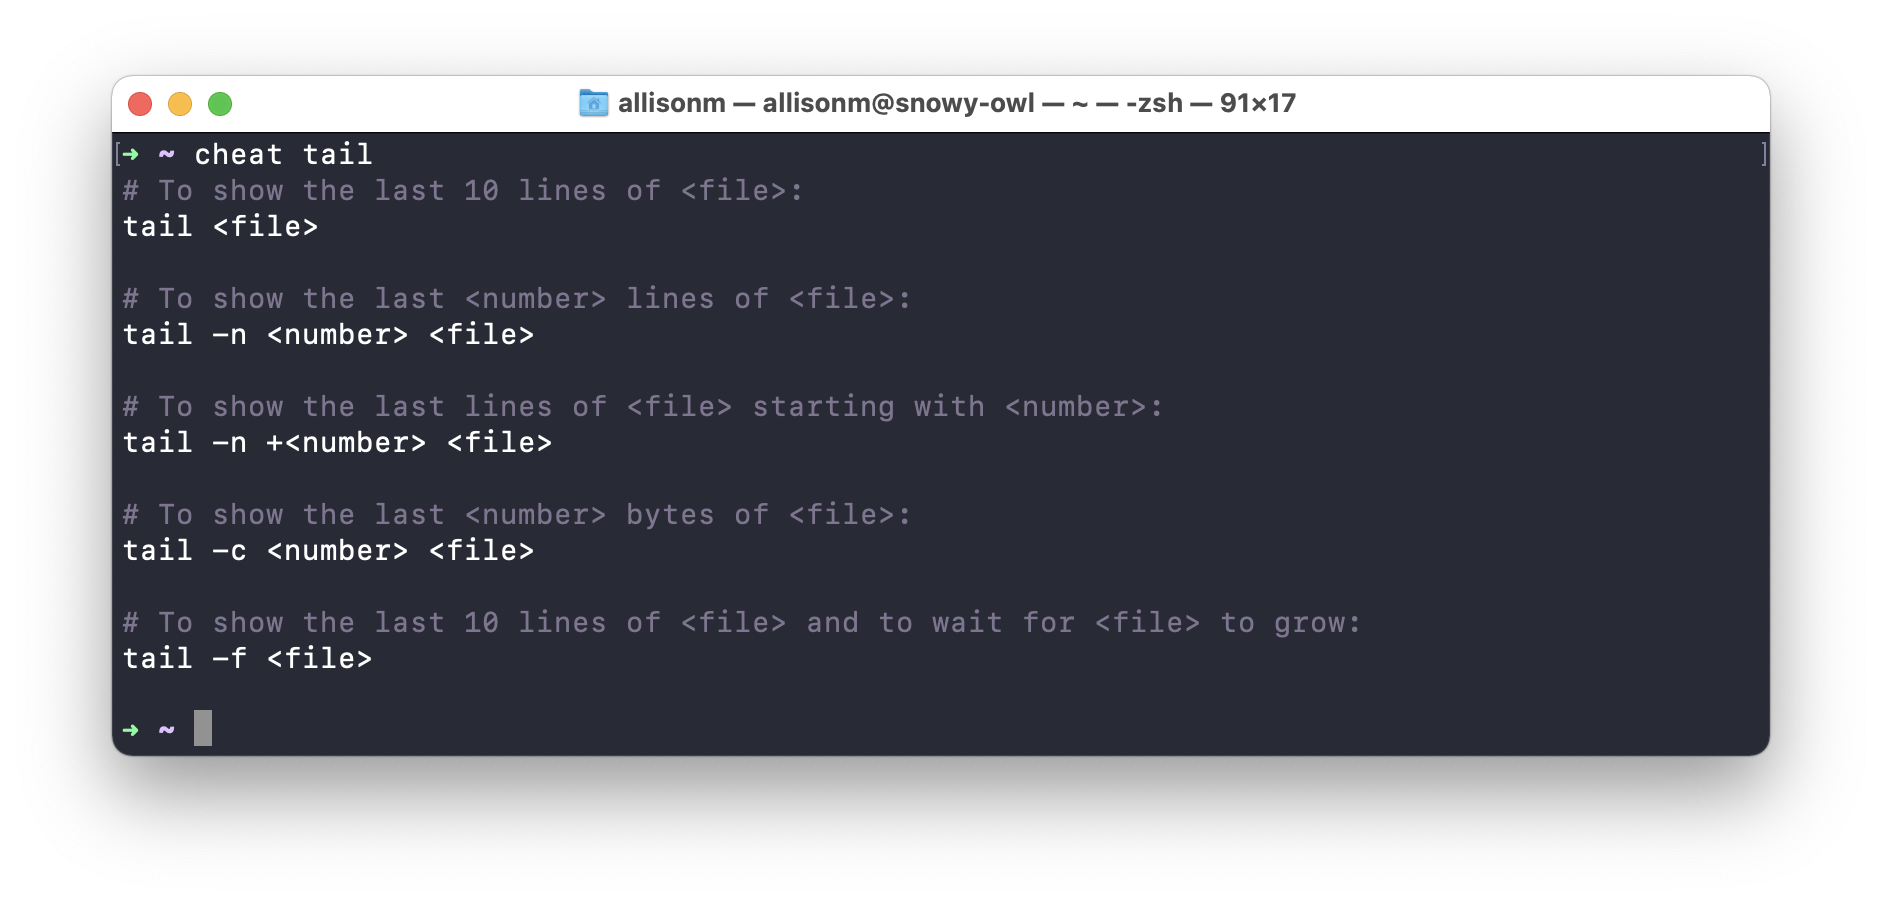
- You can download
- If you need to repeat many commands or sequences of commands, especially complex ones, you might consider writing a shell script, a text file that can do this for you. See e.g. https://www.tutorialspoint.com/unix/shell_scripting.htm